Posted: Saturday 2 March 2013 by Hacking Simplified in Labels:
0

Tools for Linking Blogger and Social Network sites


"Follow-me"


Inviting readers to connect your account to theirs on ...
  • LinkedIn:  There must be a way - not found it yet.


"Look at This"


Giving readers a tool to talk about or recommend your blog-post in their account in:
  • Email-this-post:
    Turn this on using Design > Page Elements > Blog Posts - tick the Show Email Post Links button.  You have some options deciding where in the post it goes.  

A Word about Third Party Tools:

Until recently, a common approach has been to use a 3rd party tool, e.g AddThis.

But there have been some less than well-behaved tools which are effectively hackerware (eg the TweetMe widget) - so it's been hard to work out what to trust.

Personally, I almost jumped out of my skin the day I first used an AddThis button on a newspaper site to put a link to an article about me onto my Google blog:  half-an-hour later I suddenly realised that I'd just given my main google account password to a 3rd party that I knew nothing about.  I couldn't get to a computer to change it fast enough!.

I don't recommend installing any tool that asks a reader to enter their password for a social networking site anywhere except on that social networking site.


"Look-what-I-wrote"


Showing content from your blog on ...
  • Facebook:  Automatically updating Facebook every time you publish your Blog (coming soon)
  • LinkedIn  Automatically updating LinkedIn every time you publish your Blog (coming soon)


"Look what I said over there"


This options is about updating your blog with content from your social media site(s), and has a few possible approaches.

1 Use an RSS feed:


Burn (or just get the address of) a feed from your Twitter / Facebook / LinkedIn etc account, than then:
  • Display it in an RSS Gadget in your blog, or
  • Use a service like feed2js.org to convert the feed into Javascript, and put the resulting Javascript into the post.

2 For Facebook, use a page badge:

Make a badge for your Facebook Page choosing to show the stream but hide the Faces and Header - this will show what was posted in the Page on your blog.    It's especially useful if you can put it in a place (eg a post or page) where the badge can be quite wide.


3 Manual update:

This won't be a popular approach.

But personally I've found that different networking tools respond best to different messages, so generally I try to do cross-platform promotion (ie from Blogs to Social Networks ad back again) in a way that customises the message for the platform - and manual is the only realistic way to do this at the moment.

Posted: by Hacking Simplified in Labels:
1

Linking your Blog to the Social Networks
This article is about the difference between blogs and social networking sites, and the ways you can link your blog to the various sites.


Blogs vs Social Networks


The words "Social-network" or "social media site" usually to refer to Google+ Facebook, Twitter, LinkedIn, Bebo, MySpace,  etc.   But they can include any site that you think of as part of your own network of people.   Some people even include Flickr and YouTube in the list, though personally I still see them as about file sharing rather than "friendship", even though you can define groups of people that you share the files with.

Your blog is also part of your on-line social network.   But it's different from the other social-media sites:

1)  It makes sense for one person to have more than one blog - it doesn't make sense to have multiple personal Facebook accounts (there's only one you) , and

2)  A blog is mainly about showing people your writing (or photography etc) in longer amounts (posts), with a small amount of profile information.   The other social-media-sites are mainly about having a larger profile, and putting small bits of writing (status updates) with that.

3)  In your blog, history is kept - history matters.   In the social-media-sites, NOW is what matters most.   We don't really know how long the various social websites will keep history on-line for, but can you imagine caring about what someone tweet-ed ten years ago, unless you're a historical researcher?


Ways of linking your Blog and the Social Networks


There are many, many different options for linking your blog and regular websites.

Social media offer a more limited range of options, because you generally can only change the content, not the structure, of your site there.   But it can be difficult to understand the different types of links, because people are quite loose in the way they're described.

At the moment, I'm seeing four main approaches to linking your blog with the "social networks":

"Follow-me"

Asking your blog-readers to link to their own social-media-site account to your (or your blog's) account on the social-site


"Look at this"

Giving your readers a tool that they can use to update their own social-media site (usually their status) with a reference to the page on your blog that they've just read.   This may involve sharing, or just noting their approval ("liking") your site.


"Look-what-I-wrote"

Automatically updating your social-network-site with content that you posted on your blog.

This has a variation, "look what she wrote" - setting up your social-network site to automatically show what some other interesting person said.


"Look-what-I-said-over-there"   

 Automatically updating your blog with content that you posted on your social networking site.


Making the links

Having identified these ways of linking your blog and Facebook, Twitter, etc, the next step is to actually make the links.  The social networks do these things in different ways, and not every type of link is available in each network, yet.   See Tools for linking your Blog and the Social Media for more specific information.


Working out what to post where

Sometimes, you might want to make the links so that people can follow you where they want to - but still use different tools primarily for different audiences, based on who actually uses each network.   This template can help you work out what you want to use each network for.

Posted: by Hacking Simplified in Labels:
0

Blogs, Blogger, bloggers, Posts, Pages and Screens - some basic definitions 
Google, Blogger and Blogging, Posts

Pied-billed Grebe 0561 Google, the noun, (sometimes called Google Inc or Google Ltd) is a company.  They became famous by creating a very, very useful search engine.  Since then, as well as making the search engine even better, they've created (or purchased) lots of other tools as well, and become rich by selling on-line advertising space inside their tools.

Using their most-popular tool (www.google.com or your local version eg www.google.co.uk), you can google (a verb), ie search, for things.    (The same way that you can hoover the floor, or xerox a piece of paper

A blog is a "binary log" - geek-ese for "a diary you keep on the internet".   A blog can contain anything you want to write, for example:
  • a fantasy story that you made up, 
  • a factual account of your life, 
  • your opinions about politics
  • newsletters from a club you belong to
  • information about your business and the services you offer
  • and many many more

Blogger is a piece of software (ie a computer program) provided by Google, which lets you create a a blog.

A blogger (small b) is a person who writes a blog.  They may use Blogger, or various other types of blogging software (eg WordPress, TypePad)

A Post is the basic item that you publish onto your blog.   After you have been blogging (writing a blog) for a while, you blog will (usually) have many Posts.


Pages - AKA Static Pages

In regular websites, a page is roughly the same as a screen (at least as far as anyone who reads this article needs to know).

Until recently, most documentation about Blogger talked about Pages as through a Page was something that showed one or more Posts.  (More about these soon.)

However Google introduced a new feature, called Pages, into Blogger in early 2010.

These Pages are intended for bloggers who want some material on their blog which is slightly different from the rest:  it's not part of the usual material that they publish, and stays current and relevant in a way that older posts in a blog don't.   Typical pages content includes contact-details, frequently-asked-questions, or "about this blog" statements.

Pages are edited using a tool that is similar to the Posts editor, but they have some small differences:  eg they don't have a publication-date so they don't appear in the Archive.  I have previously written a full description of the difference between Pages and Posts.

Pages also have a gadget all of their own (called the Pages Gadget), which can be used to give a "menu bar" at the top, or bottom, or in the sidebar of your blog.   

A key difference between regular websites and blogs is that Posts don't go onto Pages:  all your Posts go onto what feels like the "main page", and the other pages are for reference materials only.   There are ways around this, eg using labels to categorise your blog, and making it look like you have put posts into pages by making a horizontal linked-list of label-search statements instead of the standard pages gadget, but even this isn't quite what many people expect.

Some people refer to Pages as Static-pages, to try to avoid the confusion.  I don't use that term because:
  1. It's not the term that Google/Blggger uses, and
  2. Some of the target information (eg contact details for a club) is not static - it could change many times over the life of the blog.

Templates and Collections of Posts

A Template is a control file that says how a Blog will look.  Blogs that are about different topics may use the same template:  their content will be different, but they will look very similar to a person who reads them.

I have recently started using Screen to refer the display that Blogger generates each time that someone looks at your blog.

A Posts Screen may show 1,2, 3 or even dozens of Posts.   The number of posts shown is controlled by an option that the blogger sets (in either the Design > Page Elements > Blog Posts, or Settings > Formatting options) and by a (relatively new) feature called auto-pagination, which restricts overly large collections of Posts, so that Blogger works more quickly overall.
 
If a Blog has a Layout or Designer template (see Types of Blogger template), then there are links near the end of each screen for Newer Posts and Older Posts:  clicking them take the user to a new Screen, which shows a set of newer or older posts.

There are other types of Screen also:
  • If a blog has a Labels gadget, then clicking as option in it opens a List of Posts screen showing all published Posts in the blog that have the corresponding Label.
  • If a blog has an Archive gadget, then clicking an option in it opens a List of Posts screen showing all published Posts in the blog that were published in that time period.


Posted: by Hacking Simplified in Labels:
0

How to put put Posts into your Pages in Blogger
This article shows how to set up your blog, using Blogger, so that it looks like your posts are on separate web-pages.


Can you put Posts onto Pages in Blogger?

Ever since Google introduced "pages" into Blogger, people have complained that their posts all go onto the "home page", and asked how to put posts onto different pages in their blog.


The standard, but unsatisfactory, answer is
"Sorry, that's not how Blogger works.   So called "static" pages in Blogger are meant to be used for reference information that doesn't change often, which you don't want to be part of your regular post-feed, but which you do want users to have easy access to."

Basically, this is part of the difference between post and pages.

Luckily it's easy to set up your blog so that it looks like your posts are on different pages [tweet this],

.... even though you and I know that this isn't how Blogger works.

The only aspect that some people don't like is that their posts all show up on the "home page" was well as the topic pages, but even this can be worked around, at least sometimes.


Follow these steps:

1  Categorise your posts by adding Labels to them.


2  Make a "pages look alike" menu bar:  

There are (at least) are three ways of doing this - choose which ever one suits your blog best:
a)   With a Labels Gadget:    
Use the usual add-a-gadget approach to put a Labels gadget into the spot where you would put the Pages gadget if you wanted to make a horizontal menu bar with it.

If your blog has some Labels that you don't want to have "pages" for, then set it to show only some of your Labels:

         b)   With a Linked-list gadget:   
Use the usual add-a-gadget approach to put a Link-list gadget where you would put the Pages gadget if you wanted to make a horizontal menu bar with it.
Add a link to the list for each Label that you want a "page" for.   The HTML to use for each Label value is

http://YOUR-BLOGS-URL/search/label/THE-LABEL-NAME

You can also add other items (eg individual Posts, or even Bllogger's static "pages" if you really must have them - see why I don't like them!) - see the menu bar at the top of this site for an example of this.


c)   With a Pages gadget:   

Use the usual add-a-gadget approach to put a Pages gadget into the menu bar area.
Use Label-links described above the Linked-list gadget option, as website links to add to your Pages gadget.


3   If you don't want all posts to appear on the "home page" was well as the topic pages, set your home page to show zero posts, by setting  "Number of posts on main page:" = 0   on:

Post-Sept-2011-Blogger (aka the new interface)   Layout  > Blog Posts (edit),
Pre-Sept-2011-Blogger (aka the new interface)     Design > Page Elements > Blog Posts (edit)


Alternatively, you could use a technique similar to Showing a Gadget only on the Home Page  to not show the Blog Posts gadget on the home page.  the condition to use is !=  instead of ==)   If you do try this, then I strongly recommend that you consider the various options for giving your blog a home page, and make sure you accept the disadvantages of editing your template.


Job Done

It really is that simple.  Your readers can now click on the "pages" in your blog from a "menu" at the top, and see a list of posts for the Page that they chose.   Even better, if some posts relate to more than one topic, they show up on both of the relevant pages.

Don't forget to test your blog, to make sure that the menu bar is working how you expect it to and that it looks OK, in all the browsers that your readers are actually using.


I'm keen to hear if this approach works for you.
  • It is a "good enough" alternative to "real pages"?
  • Are there any other side-effects of using Labels to "pretend" to be web-page titles?
Please leave your thoughts in the comments box below.

Posted: by Hacking Simplified in Labels:
0

Copying all the posts from one blog to another

Overview:


New Holland tractor with NH 850TL front loaderTo copy all the Posts from one blog to another, you need to export them from the first blog, and import the file that was created into the second file.

Any Pages (see The Difference between Posts and Pages) in the first blog, need to be moved individually, because pages aren't currently included in the export file.

If you want to totally replace the contents of the destination blog with the contents of the source blog, then you should delete the existing posts from the destination blog before you import the file.  (Delete posts by going tothe Posting / Edit Posts screen, and pressing the Delete button that is beside the post.   Don't delete the entire blog, or you will lose access to the URL).


Follow these steps to copy all posts from one blog to another:


1  Log in to Blogger.

2  Go to the export tab:
In the pre-Sept-2011 Blogger (ie the "old" interface) this is the  Settings / Basics tab.   OR
In the post-Sept-2011 Blogger (ie the "new" interface) this is the  Settings / Other tab.


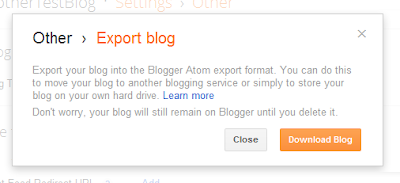
3  Click on Export Blog.

Export-blog window on the old Blogger interface: the new interface looks a little different, but has the same links

3a  If you are using the new interface, click Download Blog on the confirmation message window:


4  Your computer will download a file.   For Windows users, it will probably be put in the My Documents / Downloads file.  Or system may use another place, or may ask you where to put it.   Whatever happens, you will need to know where this file is saved to.

5  Open the blog that you want to move the posts to
(You may need to log out and in again, or perhaps just switch to different browser or tab)

Delete (using Posting / Edit Posts) any Posts that are already there, but which you don't want in the refreshed blog.

6  Go to Settings > Basics (old interface) or Settings > Other (new interface) again. This time, click Import Blog.  When the box opens, choose the exported file that you made earlier, and enter the security-text.
Import file selection screen in the new interface: the old version of Blogger is very similar.

7  Choose whether or not to automatically publish all imported posts.  
Only tick the box if you DO want the posts automatically imported.   If you don't tick it, the posts will be loaded, but with have status of Draft, so won't be visible by readers until you publish them.

8  Click Import Blog.

Check that the import worked successfully, by looking at the blog, and also at the list of posts under Edit Posts:  are the right number of posts there, do they have the right labels etc.


Results:


IMG redCowRoadworks4586All the posts from the source blog will be copied to the destination blog.

Many of the post characteristics will be the same as in the original blog.  This includes:

  • title
  • post contents
  • published-date and time
  • label(s)
  • post-author.


Any comments from the source blog will also be copied over - sometimes it takes a few hours for the links for them to be re-establshed properly.

The URL for each post will be based on the URL of the blog you have imported them into and the publication-date that the posts had in the source blog - for example:
www.YourNewBlogName.blogspot.com /2009/05/name-based-on-post-title.html

Any internal links in the blog will still point to the post in the old blog
For example this link points to a popular article in Blogger-HAT.  
If I export-and-imported this post into a new blog, the link would still point to the same place, ie the post in Blogger-HAT - not to the post in the new blog.

Any pictures, videos etc in the old blog will still be in the same place that they were in (Picasa-web-albums, YouTube, Google Videos etc).

If you have imported more than the number of posts that Blogger allows per day (currently 50 I think) then to make any more posts today you will need to complete the captcha-test (ie entering the letters in the funny-shaped word).   This will go away approximately 24 hours after you last enter more that the maximum-posts-per-day.


Importing to the same blog:


If you try to import posts into the same blog that you exported them from, Blogger will not import any posts, and give you an error message.

If you do want to do this (eg to create a duplicate set of posts), then do the export, change some small detail of the original posts title or date/time, and then do the import.

Posted: by Hacking Simplified in Labels:
0

Types of Blogger template
This article is about the types of template that apply to your Blogger blog, and how you can work out what type of template you have. 

What types of template does Blogger have:

Puppeter templateBlogger users templates to know how to structure your blog:   all template-types except the new Dynamic-view templates allow you a lot of freedom to customise how your blog looks.

Ttemplates are the "framework" that Blogger uses to let us do this, but still offer the features that a blogging platform provides.
Currently, each blog made with Blogger has:
  • One post template:
    There is only one type of post template, adn it is edited from Layout > Blog Posts - and not customisable apart from this
  • One design template:  
    This template may be one of four different types:  Dynamic, Designer, Layout and Custom.  

Also, each template may have a mobile template, which is used only when someone views the blog using a mobile device (eg smartphone).   A blog only has a mobile template if this has been enabled for it (on the Template screen).

When you have looked at a few blogger options, you will begin to recognise the different types of templates, just from the way blogs made with them look on screen.    The following sections describe the types of design templates (which include Designer templates, just to be confusing), and show you how to tell if your blog is using them.

There is also a very quick way to find out the name of your template - often knowing the name will let a Blogger Helper understand what the problem is, and so make suggestions about how to fix it.


The Custom Template:
The first design template that Blogger had was a custom template - and there are still some blogs with these today.

With a custom template, the only way to change the layout of your blog is to edit the HTML;  there are no widgets, and no drag-and-drop editor for positioning things.


How to work out if you have a Custom template:

Post-Sept 2011 Blogger (aka the new interface):  
If you go into the Template tab, and the first thing you see is "Give your blog a whole new look!", and at the bottom of the screen there is an area called "Edit Template HTML", then your blog is using a Classic template.


Pre-Sept 2011 Blogger (aka the old interface):  
If your menu options include "Template", but don't include "Layout", then you have a Custom template.


Layout Template:
The Layout template was the next to be introduced.   It includes the Page Elements editor and the idea of Gadgets (previously called Widgets and Page Items).  This was a great improvement because it let blogger users move items around their design by drag-and-drop, instead of by editing HTML.

These templates (Minima, Rounders, ....) were a great step forward in the early 21st century, but web-technology has moved on.     They are no longer available to choose in the new Blogger interface, but  can still be selected in the old interface.

How to work out if you have a Layout template:

Post-Sept 2011 Blogger (aka the new interface):  
Go to the Templates tab, and choose Customize.   If there is no template name given underneath "Live on Blog", and no template selected in the area to the right, then you have a Layout template.


Pre-Sept 2011 Blogger (aka the old interface):  
Go to the Design tab and choose Template Designer.
If the Background and Layout tabs (down the left hand side) have message like "Not applicale for this template", then you have a Layout template.


Posted: by Hacking Simplified in Labels:
0

Using a domain purchased from another domain registrar or blogging-platform for your Blogger blog
1lkkA SH2 domain
The easiest way to give your Blogger blog a custom domain is to pick an URL that is currently available and purchase it through the Settings > Publishing  tab.   If that is s successful, all you need to do is set up an administrator account for your domain.   (Sept 2012:  this option is currently unavailable - hopefully it will be back soon.)

But sometimes the URL you want will not be available through Google / Blogger:
  • Maybe it's owned by someone else
  • Maybe you own it  already, because you purchased it through another domain registrar.  
  • Maybe you don't have a credit-card so cannot purchase through  Google.  
  • Maybe it's for a country that Blogger doesn't sell domains for (eg Ireland).


In these cases, you can't use Blogger to manage the domain.  Instead, you need to buy it another way - or get control of it if someone else already owns it.

Then after you own the domain, you need to set it up with the correct settings to work with Blogger.   To do this, you need to use the settings information that Blogger provides and the domain management tools (usually a control panel, aka CPanel) provided by your domain registrar.


If you are buying a domain from a registrar


If you need to (or already have) obtained them domain name through a domain registrar, you need to  purchase both:
  • Name registration, and 
  • DNS Hosting
You do not need to purchase file-hosting from them, because Blogger provides this for our blogs.

There are some registrars that don't offer domain hosting separately from other hosting packages.   In this case, it's your choice whether to use this company or to use another one.   There is no harm in purchasing file hosting that you are are not going to use - except that it's a waste of money.

If you find that your registrar doesn't offer DNS Hosting at all (unlikely) or that you don't want to pay the fee that the charge (which may be quite high if they only sell it with file hosting), then you need to transfer the domain to another registrar (which does offer DNS hosting) before you can use it for your blog.


Setting up a domain for your blog

Once you have control of the URL, follow these steps to set up your blog on it:


Go into www.Blogger.com and using the now-standard (ie post Sept 2011) interface.  


In  Settings > Basic >  Publishing > + Add a custom domain >  Switch to Custom Domain > 
  1. Fill in your domain name, then
  2. Click Settings instructions
  3. If you are told "You have unsaved changes that will be lost.   Leave this page anyway"  (or similar) - choose OK / Leave this page.


This opens a page of instructions which contains the values you need to use in the next step.


At the top of the page, you are asked the following question.

Where would you like to host your blog?

If you don't understand this, just click on the top-level-domain option.   (If you do understand it, you don't need me to tell you which option to choose!)


2)    In the domain-management tool for your domain, set up the DNS records (ie CNAME and AName records), using the values from the page that is opened.

The way of setting up the domain records is different for every registrar.  You may need to read the help file, or ask the domain registrar's customer services department for help.   Or, if your domain registrar is GoDaddy, then this tool makes it especially easy.  (That said - at the moment it is not setting up the 2nd CNAME record for you - still need to do it yourself.)

You need to setup up two CNAME records.
  • The first CNAME record should have your domain URL and ghs.google.com
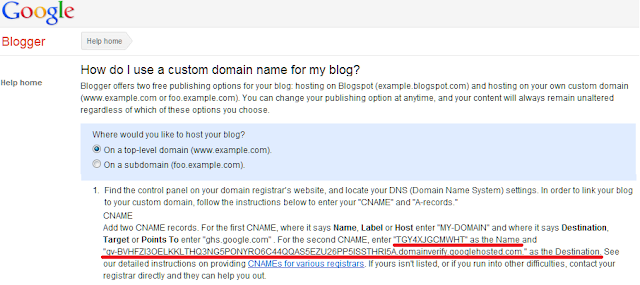
  • The values for the second CNAME record are buried in the text of the instructions page - I've underlined them in the following picture to help you find them.   (Hopefully Blogger will make this easier to read soon.)


You also need to set up four ANAME records - see further down in Google's instructions page for the values to use for these.


Wait an hour, and then go into www.Blogger.com again   (NB  you may not need to wait the full hour, but it's safer).  
NB   If you wait too long, then the 2nd CNAME combination that Google gave you will have expired, and you will have to do that step again,    So I'd suggest waiting an hour, and no more.


In Blogger, go to  Settings > Basic > Publishing > + Add a custom domain >  Switch to Custom Domain > 
  • Fill in your domain name (yes, again).
  • Click Save (just under the pane)

If get a message
We have not been able to verify your authority to this domain. Error 32. Please follow the settings instructions.
then you did not get the set-up in correct in your domain-registrar (or maybe you haven't waited long enough - or waited too long!)


If you do not see that message, then your re-direction was successful.   However you may need to allow a bit of time (maybe a few minutes, maybe as long as three days) for the changes to take effect.

Test whether they have been applied by typing your custom-domain into a web-browser:  you should be taken to your Blogger blog.


Ask for help if you need it:


There are many things that can go wrong when you are setting up a custom domain, and error messages like "Another blog is already hosted at this address" are quite common.

If the process described above doesn't work after three days (72 hours), or if you get an error message other than "site not found" before that,  the post a new question in the Blogger Product Forum:  Include these details:
  • Your custom-domain name / URL, 
  • Your blogsplot URL 
  • The date andtime that you made the change (don't forget to include your timezone)
  • A description of what's happening.

Some of the helpers in BPF are expert at diagnosing what's wrong and telling you how to fix the domain, and very happy to help provide you give them the information that the need to work out what's wrong. 


What if someone else owns the domain


Before you start, you need to own, or at least control, the domain.

If someone else currently owns a URL that you want to use, you need to:
  • Negotiate with them, and get them to agree to transfer the domain to you
  • Set up an account with a domain registrar
    (GoDaddy are the registrars that Google currently uses for Blogger users:  if you use them, you can be certain that the domain-management tools provided will do everything Blogger needs you to do.
    GoDaddy also have a tool that makes it extra easy to use one of their domains for Blogger - log in to your GoDaddy account, and go here to access it).
  • Using that domain-registrar account, request that the domain is transferred to you
  • Do anything else (eg make a payment) that you told the current owner that you would do (eg make a payment)
  • Make sure that the current owner does whatever is needed to transfer the account to you.
Even though Blogger provides some "nice" tools that make URL management easier for "first time buyers" of custom domains, they are not a domain registrar themselves.  This means you cannot transfer a domain that was purchased through another domain registrar to Blogger / Google.   Instead, you need to follow the steps below to use the domain-name for your blog.


A note about Google Apps and Sites domains:
If you purchased a domain through Google Apps or Google Sites, then you already have control over it.

But you may need to disable sites in the account management screen before you can use the domain for your blog.

And after you have done this, you can go straight to Step 3 of the next section, because the CName and AName records are (already set up to use Google's servers.


Posted: by Hacking Simplified in Labels:
1

Putting Adsense ads inside Blogger posts

This article looks at how to place AdSense ad units right inside Posts or Pages on a Blogspot blog.


Background:

Once you have signed up for AdSense, you can easily put Adsense ads into blogs.  Blogger has options that let you place ads gadgets in the page template, without seeing any HTML code.  Ads may be placed in the sidebar(s) and in the footer of each post.

But there are limitations to this, and sometimes ads in your sidebar aren't the best approach, because readers easily become "ad-blind" and ignore them.


A Better Approach?

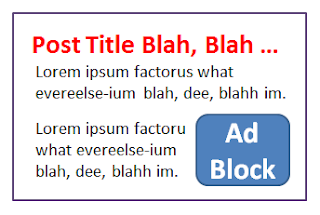
To make it more likely that readers will see your ads, you may want to put them into the body of your posts, as I have done underneath this paragraph.

R.D.K holdings S.A


This won't always be better than having ads in your sidebars or immediately above or below your posts - it all depends on what your blog is about, and how people read it.   But it may be worth doing to test to see which placement is better for your blog.


How to put Adsense Ads into Posts or Pages:

Blogger doesn't have any tools to support this.  So you need to put the AdSense code into your posts yourself.   While this is a bit fiddly, it does mean that you have a lot of control over where the ads go, and how they look, including the option to show image-only ads.

Follow these steps:

  1. Get the ad-code, and copy into your clipboard.  (The AdSense help page for this is here.)
  2. In the Blogger editor, write the contents of the post.
  3. In  Options (under Post Settings in the bar on the right of the Post Editor), check that "Use <br /> tags" is chosen for the Line Breaks setting.
  4. Go to the place where you want to put the ad.  Put in some "marker text" (a word that isn't used the post, eg "XXX" ).
  5. Align the marker text  the way you want the ad aligned (eg centered).
  6. Choose the "HTML" tab, and go to the marker-text.
  7. Replace the marker-text with the ad-text from step 1 (ie paste it in)
  8. If necessary, put line-breaks (<br />) before or after the ad.
  9. Publish the post, and check that it looks the way you meant it to.

Things to be aware of:

Google will only display a certain number of ad-units per page.   Even if you try to show more than this by putting the code into posts, ads will not be shown.

Also, having ads inside your posts does not mean that they will show up inside the RSS feed of your posts, or inside emailed posts created with the follow-by-email gadget or some other way:   If you use these tools, then you may want to enable AdSense for Feeds.

Posted: by Hacking Simplified in Labels:
0

Using Labels to categorize your Blogger Posts

Why to categorise your Posts

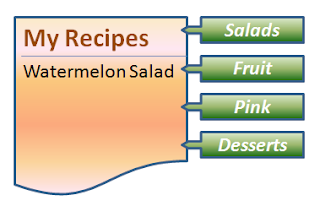
watermelon salad recipe can be labelled / tagged as  fruit, salad, dessert and pink
Grouping your blog's contents makes it easier for people who have reached your blog via Search to find other posts that they may be interested in - provided you add tools to your blog that let them navigate using labels.

It's essential if you want to make it look like you have put your Posts into Pages.

And it helps you to find posts yourself.


Blogger's tools for working with categories

The only tool that Blogger provides for categorising or grouping Posts is Labels.

In short, Labels are tags that you apply to posts.

Each post can have as many Labels as you want (there is an upper limit of 5000 labels-per-blog, but most people don't get near it).

And you can use labels for different purposes.  For example, a post titled "Photographing Long-haired Black Cats" could have three different labels
  • Cats - the the animal it's about
  • Photography - for the functional category
  • Jane Smith - for the author
The Labels gadget lets readers choose which groups of posts to see:  when a visitor clicks an item on the labels gadget, they are shown a list of posts that have the selected label applied to them.

You can add the Labels gadget as many times as you like, selecting which specific label values to show each time.   In the example above, you might add it three times, once for ainmals (showing Cats, Dogs and Rabbits), once for function (showing feeding, grooming and photography), and once for author (showing Jane Smith and Joe Bloggs).


How to add Labels to your blog:

1  Label your Posts:

For each post, add one or more labels.  You can add labels

Using the pre-Sept-2011 / old blogger interface:
  • In the post-editor, at the bottom right of the editor screen, or 
  • From the Edit Posts tab, by ticking the posts you want to put the labels on, and then choose the label or "New label ...") from the Label Actions drop-down box at the top of the screen.

Using the post-Sept-2011 / new blogger interface:
  • In the post-editor, in the Labels section at the right side of the post-editor or 
  • From the Posts tab, tick the posts you want to put the labels on, and then use the drop down arrow from the top icon that looks like a small luggage-tag:   choose the label or "New label ...").

2 Add the labels gadget:

Add the Labels gadget to your blog - the same way you would add any other gadget .   You can add it as many times as you need, choosing which labels to show each time.
 
Warning:  If you choose to show only a certain selection of Labels in a gadget, then this is all that it will show even if you add new labels to your posts later on.  However if you don't restrict which labels are shown, then new ones are automatically shown in the gadget if they are associated with published posts.

Drag-and-drop the labels gadget to wherever you want it:  some people put it just underneath their header, to make readers think they've looking at a more traditional web-page.

3 Add Labels navigation

Another way for your readers access labels is from the display in the post header or footer of the list of labels assigned to each post.

This is turned on by default in most templates:  you can change the setting and move it around using post-templete settings found under:

Using the pre-Sept-2011 / old blogger interface:   Design > Page Elements > Blog Posts (edit).
Using the post-Sept-2011 / new blogger interface:  Layout  > Blog Posts (edit)


What your visitors see:


A List of Posts:

If a visitor to your blog clicks on an item in the labels gadget or in the labels-list that is show for apost, then the "labels-view screen" is used to show them the posts that have the selected label.

This screen is like the main screen: is only shows a certain number of posts and visitors need to use the newer-posts and older-posts links to move back through the list.

Like the main screen, if you have used jump-breaks in your posts, then the list only shows the first part of each post.  If you haven't used jump-breaks, then the whole posts are shown.


A summary message:

Unlike the main screen, in most templates there is a message at the top of the page saying:
"Showing newest posts with label WHAT-EVER-YOU-CHOSE. Show older posts"

Or if there are no published posts with the selected Label, the message is slightly different.  Some people change their template to customise or remove this message:  Chuck in The Real Blogger Status has written an excellent description of  how to do this.


What Labels aren't - but appear to be:

Many people think that Labels are a way of actually putting Posts into pages.  However the Posts aren't actually moved around.  The labels-screen is just a way of viewing a smaller-than-usual group of Posts, and can make it look like you have put your posts into sub-pages.


Making multi-level categories:

Currently, Blogger only supports one level of grouping.  The only way you can make sub-groups of Labels is to add two categories to each post - one for the "major" category, and one for the "minor" category

For example you might use labels like these
Major category:  Minor categories:
Recipes: Sweet, Savory, Wheat-free
Party-games: ice-breaker, run-around, silent, outdoor
Music: lively, soft & gentle, traditional, instrumental
Each post would need to have at least one label from the major category, and one from the minor categories.

If you do this, you need to be clever about adding two levels of gadget, with only a selected group of labels shown in each gadget.   You might even need to edit your template, to only show certain gadgets in certain situations.

Posted: by Hacking Simplified in Labels:
1

The Difference Between Pages and Posts
In Feb 2010, Blogger introduced the Pages feature: this gives you a way to make some of your "postings" special, and to have a link to them from either a menu bar in the header or a link-list in the sidebar (using a gadget that is provided for this, and integrated with the Pages editor).

Some people call them "Static Pages", because one use for them is to contain reference information that doesn't change often and which shouldn't ever be on the top of your blog  (unlike regular posts which are "dynamic" and regularly have now content added to them.).

Google's explanation of Pages is here.


What's special about pages:

Initially, I thought Pages were just special cases of Posts, without a publication date.  That's true, but they have some more features, some of which I didn't expect.   Here is everything I've noticed so far:

1 You edit them through a separate option on the Blogger dashboard

When you go into the Pages option, the list of Pages, isn't quite the same as the list of Posts.

Pages that are already published have a blue background, and a View link in the Edit Pages tab.
Pages that are draft have a grey background and the word "draft" underneath them, and no View link

You can have more than one Page with the same title (even though this looks silly on your blog).
 

2 Pages don't have a date associated with them.

  • They aren't listed in your Archive gadget,
  • They cannot be accessed using the New Post / Older Post links.
  • They aren't included in any RSS feeds from your blog

This means that you need to use either the Blogger-supplied Pages gadget, or another gadget (HTML, link-list, etc) that you set up to include links to your pages.   If you don't, then there is no way that readers will be able to get to your Pages.


3 Only one Page is shown at a time

Because of this, the jump-break feature isn't implemented in the Pages editor, and any jump-break that you manually put into a Page (using the <!-- more --> HTML code) is ignored when the Page is displayed.


4 Pages don't have labels

So they won't be included if you use the Labels gadget


5 Pages aren't included when you export your blog

On the Settings tab, there is a tool for exporting and importing blog contents.   Pages are not included in the file created by the export option.

If you want to take a back-up copy of your pages, you need to move the code for each one individually.

(I think that this was probably an oversight or defect, it wouldn't surprise me if Google quietly fix it sometime soon.
UPDATE:  I've heard a rumour that this has been changed and that pages are now exported, but aren't automatically published when you import from that file.  still to confirm if it's true or not.)


6 Pages cannot be set as your home page

By default, your "home page" shows the Post with the latest Post-date.  There are various ways around this.  And now the best one (see the top of that article) lets you use a Page as your home-page.


7  Pages are not included in RSS feeds

So they are one way to sharing information that you want to stop notifications to your subscribers about.


8 The Amazon product-finder isn't shown on the page-editor.

This was one of my initial observations back in 2010 - since then, the end of Blogger / Amazon integration has removed the product editor from the post-editor totally.


9 The Pages editor is the "new editor" only: you do not have the option to use the old editor for them.

This was another observation back in 2010 - it's since become obsolete because the old editor isn't available any more in the "new" Blogger software (first piloted Sept 2011, became compulsory for all users in Sept 2012).

10   Other missing options.

You cannot set a perma-link, or enclose links in the title of Pages.


11    Pages don't even have to be "post-like"

Initially, "pages" had to be like mini-posts.   But now they can simply be a menu-bar entry link, pointing to some other web-address - and so this gives you access to a clever way of putting posts into pages.

Posted: by Hacking Simplified in Labels:
0

Understanding Google Accounts
Blogger accounts vs Google accounts

Once upon a time (pre 2006), there was a tool on the internet called Blogger.   People created accounts on Blogger, and then used them to make a blog that was owned by their Blogger account.

Then Google (the company that made the search engine) purchased Blogger.   They wanted to integrate their products, so Blogger users had to change their original Blogger accounts to "Google accounts".  (Google were pretty nice about this:   they kept support old, unconverted Blogger accounts up til 2011, but have recently said that this will stop soon.) 

At the time, very few people understood the difference between Google-the-company and Google-the-search-engine, so most didn't have any idea of the power and importance of these "Google accounts".   However as the other applications available through our Google accounts grew (Gmail, Picasa-web-albums, Google-custom-maps, AdSense, AdWords, etc), this has become clearer.


Getting a Google account

To make a new Google account, you just have to sign-up for any one of the products that Google offers (Gmail, Blogger, AdSense, etc).


The sign-up screen asks you to enter an email address, and says that it "(must already exist)".  But it does not check that the email-account does actually exist.

If the product that you sign up with is Gmail (which is where Google accounts started, I think), then it makes sense that the account name is the email address.

However Google (or perhaps even Blogger:  I don't remember) decided that people would use a text-string that looks like an email address as their Google-account name - even if the email address isn't a Gmail one, and even if there is no valid email account with that address

This means there are Google accounts called fugu.blogs@yahoo.com, and similar.  There are even Google accounts with a name that is not, and never has been, a real email address.  This has caused lots of confusion and problems:
  • If the email address isn't a gmail one, then changing the password of the email doesn't change the password of the Google account
  • Some people don't understand that their Google account name is just a set of letters: they don't realise that they can change the email address attached to their account without changing the underlying account (Dashboard > Edit Profile, identity tab).
  • Some people lost access to the email address (eg because they leave their job, or use a free service and didn't log on for 30 or 60 or however-many day).
  • Some people never had access to the email address, because they used a text-string that wasn't actually an address, and Google never checked if non-Gmail addresses actually worked.
In these cases, problems happened when that email address was the only tool that the person used to identify their Google accounts.  If it's not real, or they can't access it any more, then Google can't help when they forget their passwords,etc.  So there are some blogs that can never be accessed ever again, because Google has no way of being sure who owns the Google-account that made them.

Posted: by Hacking Simplified in Labels:
1

Copying a post from one blog to another
This article is about how to copy a post from one blog to another, using Blogger, while keeping all the formatting, pictures and layouts.

There is a separate article about copying all, or most, posts from one blog to another.


One way to move a post from one blog to another is by copying and pasting it into the post-editor in a new Post in the second blog.

However sometimes this doesn't work:  formatting, picture positions or hyperlinks are lost.

But behind every Blogger post is just HTLM:  So, you can can copy content from one Post to another by copying the HTML, and pasting it to the destination blog as HTML.

This works even if the blogs belong to different Google accounts (although sometimes you may need to save the HTML in a text-editor (eg NotePad) while you log out and in again, or perhaps even email it (as a plain-text) message to someone else who has author rights in the second blog.


Follow these steps to move a post to another blog:

1  Log in to Blogger, and Edit the post you want to move.

2  Click on HTML (or Edit HTML in the old Blogger), to see the code behind the post.


Copy all the code 
(put the cursor in the code, ad  press Ctrl / A to select it, then press Ctrl C to copy)

Open the blog that you want to move the post to
(You may need to log out and in again, or perhaps just switch to different browser or tab)

5  Create a New Post


6  Click on HTML or Edit HTML, so you can see the space where the code goes

Paste all the code

8  If necessary, click on Post Options and make any changes you need there (eg viewing or not viewing comments or back-links)

9  Click Publish, and check that it looks ok


This an easy way to move an individual post (or part of a post) - there are other easier ways to move all posts between blogs, and move some posts between blogs.

Posted: by Hacking Simplified in Labels:
0

Putting a Facebook "like", "send" or "share" button on your blog

There is an official Facebook button that your readers can use to share your blog, your current post, or any website, on their own Facebook account.  This article describes how to get the code from Facebook and install it into Blogger - but most of the information applies to other blogging tools (Wordpress, TypePad, etc) and many other web-site tools also.

Background

Previously I've described the different ways that you can link your blog and the social-networking sites.

Facebook badges can be used to send your blog's readers to your personal Facebook profile, or to your page.  These are an example of the "follow me" approach.

But often blog authors want to give their readers a tool to share the blog that they are reading on their own (ie the readers own) Facebook account - that is to use the "Look what s/he said" approach.

Your readers could just copy-and-paste a hyperlink to your page into their own Facebook account, but it's clunky, and means that they have to start up Facebook themselves.

Various people have written 3rd-party widgets to put a Facebook icon on your blog, set up so that when a reader clicks it the current page it is automatically shared on the reader's Facebook account.  Some even count how many times the button has been clicked.

But I really don't like, or trust, 3rd party gadgets:
  • There's no guarantee that they don't have nasty side effects on your blog.  
  • Some of them ask you to type your Facebook id and password onto a page owned by a 3rd party.   They promise that the won't do nasty things with the data - and some of them mean it.  But you just don't know who to trust.  
  • If Facebook change how they do things, there's no guarantee that 3rd party tools will also be changed:  you could easily be left with a button that doesn't work any more.
I'm not saying that all the 3rd party gadgets are bad:  I've used some on my sites with no ill-effects.   But I've never been happy about it. And the day that I used the AddThis button on a newspaper website to share an article to my personal travel-blog, I had a mini panic-attack 1/2 an hour later when I realised that I'd just given my email and AdSense password to a third-party.


One approach - Blogger's social-sharing buttons:

Google have now introduced social-media buttons which can be shown at the bottom of each post.   They only work on blogs with Designer Templates (ref Types of Blogger Templates)

They're an improvement on the 3rd party gadgets, but I still don't like the way they look, and the lack of options to customize them, so I usually have them turned off.


A better approach - Facebook's official gadgets:

The Share Button: 

The first "look what s/he said" option that Facebook offered was the Share  button, officially called the the Post To Profile gadget.

This let you customise a few features, and also had a preview function

You can still see this gadget on many web-pages.   But you cannot get the code for this from Facebook any more:  they now recommend using the social plugins (more about them below) instead.

The Share button still works though, and can be added to your site using this code:
<b:if cond='data:blog.pageType != &quot;static_page&quot;'>
<div style='float:left;padding:3px 3px 3px 3px;'>
<a expr:share_url='data:post.url' 
href='http://www.facebook.com/sharer.php' 
name='fb_share' 
type='box_count'>
Share
</a>
<script 
src='http://static.ak.fbcdn.net/connect.php/js/FB.Share' 
type='text/javascript'>
</script>
</div>
</b:if>
(I've spaced the code out a bit so it can be understoond more easily - the extra line-breaks can be removed when you use it.)

You can configure the code by changing the value of type:  other options are
  • button_count   (shows a counter beside a smaller button)
  • button (shows a smaller button, still with the word "share"
  • icon (shows the small "f" only)

See Sharing from your blog to the Social Networking Sites for more information about where to put the code, including general and post-specific options.

Notice that because the code above includes   expr:share_url='data:post.url'   you need to put it in a post-specific place in your blog.   Another option would be to replace data:post.url  with the URL for your blog, and put the code into a gadget etc.

Be aware that sometime in the future, the Share button may stop working, because Facebook stop supporting it.   I don't expect that to happen soon though, because it's now installed on so many web-sites worldwide.

The Like and Send buttons:
Facebook's official gadgets for saying "look what s/he said" are now the Like and Send buttons.

Officially, you can get the code for them on the Developers > Social Plugins > Core concepts page:  don't be put off because the page is labelled "develoeprs" - it really is quite simple to install the buttons into your blog.


However the last few times I tried to get the code from Facebook, it's refused to give it to me, saying:
"The href entered is not recognized as a valid URL.".
So this is the code I got from them before, modified to be used in a post-specific place - see below - and to not use the width that was suggested:
<script src='http://connect.facebook.net/en_US/all.js#xfbml=1'type='text/javascript'/><fb:like action='like' colorscheme='light' expr:href='data:post.url' font='' layout='button_count' send='false' show_faces='false'/>


This picture shows the options that were available when I got that code:


It's fairly easy to look at these options, and work out changes you might like to make, eg
like action='recommend' colorscheme='dark' font=''Arial layout='box_count' send='true' show_faces='true'

When you have chosen the options you want:
  • Click the Get Code button at the bottom of the page, 
  • Copy the code that is provided, and 
  • Install it into your blog (see below for more info about this).

Sharing a Post vs Sharing the whole blog:

If you put a a Like, Send or Share button into your own blog as a gadget, then what is shared is your whole blog, not the particular Post that is being read, for example   
http://blogger-hints-and-tips.blogspot.com   (this blog)
instead of
http://blogger-hints-and-tips.blogspot.com/2010/04/tools-for-linking-blogger-and-social.html  (a post)

If this is what you want your readers to do, then just put your blog's URL into the "URL to Like" field (or the expr-statement if you're using the Share button code), and add the code as a gadget.

But if you want your readers to share individual posts, then you need the Facebook-button to appear with EVERY post, in either the post-header or post footer  This is a little harder than adding it as a gadget.  To get the code to use for the Like/Send buttons
  1. Put some dummy text into the URL to share field
  2. Get the code
  3. Replace the dummy text with instructions to use the URL of the current post, ie change it from
<div id="fb-root"></div><script src="http://connect.facebook.net/en_US/all.js#appId=173511999379139&amp;xfbml=1"></script><fb:like href="DUMMY-TEXT" send="false" width="450" show_faces="true" font=""></fb:like>
to
<div id="fb-root"></div><script src="http://connect.facebook.net/en_US/all.js#appId=173511999379139&amp;xfbml=1"></script><fb:like
expr:share_url='data:post.url' send="false" width="450" show_faces="true" font=""></fb:like>

The way to add the code to your blog is described fully in Putting Share this on XXX buttons into your blog (it's done the same way, no matter what social network's share button you are adding).


What your readers see

When a reader clicks your Facebook button, they'll be asked to log in to Facebook (unless they're already logged in).


Once they're logged in, then:

If they used the Like button:
The "like" is recorded on their wall, and they are shown a small message in your site, giving then the opportunity to un-do the like, or to add a comment which is also shown on their wall along with the like.


If they used the Send button:
They are shown a small pop-up window where they can type in names (from their existing Facebook friends) or email addresses.  A message about the item is send to the selected people using either Facebook Messages or regular email for people who aren't on Facebook.

If they used the Share button:

They see a window where they can enter a message, and see the link and description that they're going to be sharing.
The link is either the page that they were viewing when they clicked the button, or another URL (if you chose the Custom URL option when you were setting up the gadget).  The description is an advertisement for Blogger.  However both of these these can be changed if your reader clicks on them.


Lastly there's a captcha window, where they have to enter some security test.